
Microcurrent facial devices deliver low-level electrical stimulation to tone facial muscles and improve skin texture when used correctly. The clinical term is neuromuscular electrical stimulation, and at the consumer level, these devices translate that technology into a safe, at-home routine. Dermatologists recognize microcurrent as a method for lifting, contouring, and firming the face without needles or downtime. The key variables are preparation, technique, and consistency. Get those three right, and you will see results that rival professional treatments.
What tools and prep do you need before using a microcurrent device on your face?
The right setup determines whether your session is effective or wasted. Start with a clean, makeup-free face. Residue from foundation, sunscreen, or moisturizer blocks current penetration and reduces the device’s contact with your skin.
Conductive gel is non-negotiable. Water-based gels with hyaluronic acid are the standard choice. They allow electrical current to pass through the skin and into the underlying muscle tissue. Oil-based products do the opposite. They insulate the skin and block current flow, which causes discomfort and delivers no benefit.

Check your device before each session. Look at the probe material, the intensity settings, and the battery level. A low battery produces inconsistent output and uneven results.
| Preparation step | Why it matters |
|---|---|
| Cleanse skin thoroughly | Removes barriers that block current penetration |
| Apply water-based conductive gel | Enables safe, effective energy transfer to muscles |
| Check device intensity settings | Prevents accidental high-intensity stimulation |
| Confirm battery charge | Ensures consistent current output throughout session |
| Remove metal jewelry near face | Reduces risk of unintended electrical contact |
Pro Tip: Apply a generous layer of gel. A thin coat dries out quickly and causes a stinging sensation mid-session.
How do you properly use a microcurrent device on your face step-by-step?
Correct technique is the single biggest factor in your results. Proper microcurrent technique matters more than most people realize, and incorrect use risks irritation or unwanted muscle reactions. Follow these steps in order.
- Turn on the device and select the lowest intensity setting if you are new to microcurrent.
- Apply conductive gel across the area you plan to treat first, such as the jawline or cheeks.
- Place the device probes flat against the skin with moderate, even pressure.
- Glide upward and outward along the direction of the muscle, from origin to insertion. Never drag downward.
- Hold each position for about 5 seconds before moving to the next point along the muscle.
- Work through each facial zone in sequence: jawline, cheeks, eye area, forehead, and neck.
- Avoid the center of the throat and the thyroid area. Direct stimulation there can interfere with thyroid function.
- Reapply gel whenever the skin feels dry or you notice any stinging.
- End the session by wiping off remaining gel and applying your regular serum or moisturizer.
Session length affects neuromuscular re-education and visible outcomes. Most devices recommend 5–20 minutes per session depending on the area covered and your experience level. Compressing sessions into less time undermines the cumulative benefit.
| Facial zone | Stroke direction | Time per zone |
|---|---|---|
| Jawline | Upward toward ear | 2–3 minutes |
| Cheeks | Outward toward temples | 2–3 minutes |
| Eye area | Outward along brow bone | 1–2 minutes |
| Forehead | Upward toward hairline | 1–2 minutes |
| Neck | Upward toward chin | 1–2 minutes |
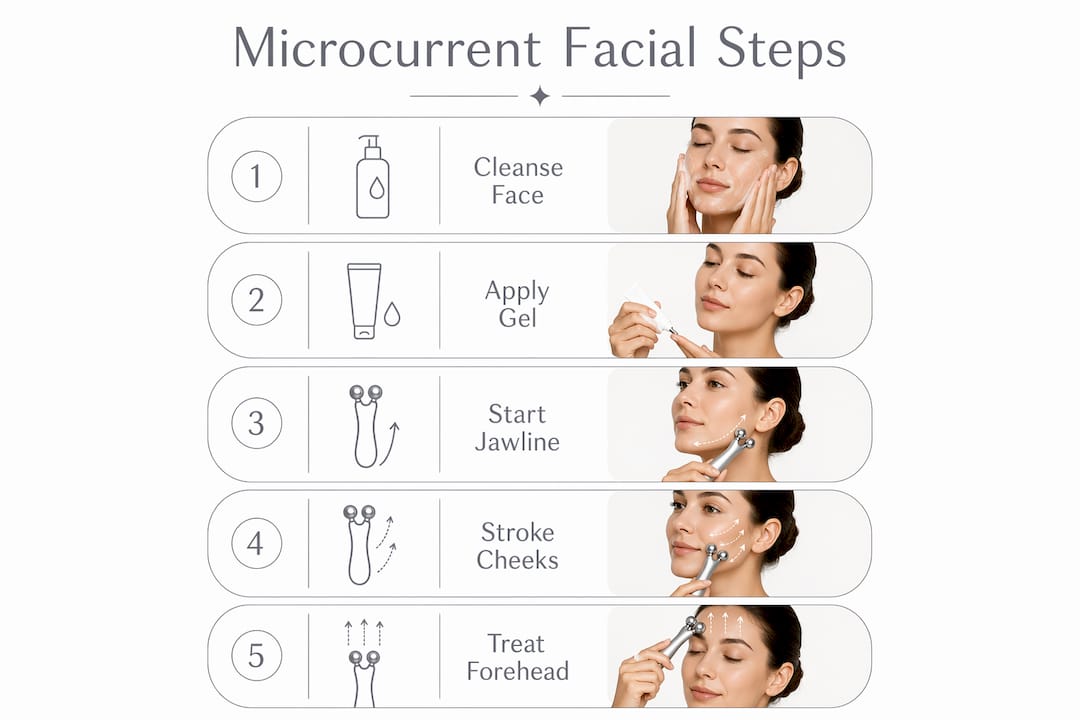
Pro Tip: Start with the jawline. It is the easiest zone to feel the muscle direction, which trains your hand for the more delicate eye and forehead areas.
How often should you use a microcurrent device for best results?
Frequency follows a two-phase model, and skipping either phase slows your progress significantly. Microcurrent treatments require 5 sessions per week for 8–10 weeks during the loading phase. This builds baseline muscle tone, similar to starting a new workout program. After that, a maintenance phase of 2–3 sessions per week sustains the results you have built.
Daily use every day of the week is not more effective than 5 sessions per week. Muscles need recovery time between stimulation sessions, just like any other muscle group in the body.
Consistency matters more than timing. Morning sessions may produce an immediate lifting effect that lasts through the day. Evening sessions support overnight muscle recovery. Choose the time that fits your schedule and stick with it, because adherence over weeks is what drives visible change.
Skipping sessions during the loading phase resets your progress faster than most people expect. Missing one week during the first two months can noticeably reduce the cumulative toning effect. Once you reach the maintenance phase, you have more flexibility, but dropping below 2 sessions per week leads to gradual loss of tone.
- Loading phase: 5 sessions per week for 8–10 weeks
- Maintenance phase: 2–3 sessions per week ongoing
- After a long break: Restart the loading phase from the beginning
- Signs of overuse: Muscle soreness, skin redness, or fatigue in treated areas
Pro Tip: Schedule sessions like gym workouts. Block the time in your calendar and treat missed sessions as rescheduled, not skipped.
What are common mistakes when using a microcurrent facial device?
Most problems with microcurrent devices trace back to a small set of avoidable errors. Knowing them in advance saves you from frustrating results and unnecessary discomfort.
Skipping or under-applying conductive gel is the most common mistake. If the gel dries out mid-session, you will feel a stinging or zapping sensation. That is the current jumping across dry skin rather than traveling through it. Reapply immediately and continue.
Dermatologists caution against excessive microcurrent use. Longer sessions or higher frequency do not speed up muscle toning. They cause soreness and skin irritation without adding benefit. Moderate, consistent treatment is the optimal approach.
Other mistakes to avoid:
- Pressing too hard. Excessive pressure does not increase current delivery. It causes skin irritation and makes gliding difficult.
- Moving too fast. Rushing through zones means each muscle receives less than the 5 seconds of stimulation needed for effective re-education.
- Stimulating the thyroid area. Avoid direct stimulation over the center throat and thyroid. Glide along the sides of the neck only.
- Using the device on broken or irritated skin. Active breakouts, rosacea flares, or sunburned skin should be avoided until healed.
- Neglecting device maintenance. Wipe probes clean after every session. Residue buildup affects conductivity and hygiene.
Pro Tip: Keep a small spray bottle of water nearby. A light mist over the gel layer extends its working life by several minutes without diluting it.
Key Takeaways
Correct technique, adequate gel, and a disciplined frequency schedule are the three factors that determine whether a microcurrent device delivers real results or just frustration.
| Point | Details |
|---|---|
| Prep skin properly | Cleanse thoroughly and apply water-based conductive gel before every session. |
| Follow muscle direction | Glide upward and outward from muscle origin to insertion for effective toning. |
| Respect the loading phase | Use the device 5 times per week for 8–10 weeks to build baseline muscle tone. |
| Avoid the thyroid area | Never stimulate the center throat; work along the sides of the neck only. |
| Reapply gel when needed | Stinging mid-session means the gel has dried. Reapply immediately and continue. |
What I have learned after months with a microcurrent device
The first thing I tell anyone starting with microcurrent is this: treat it exactly like going to the gym. You would not expect visible muscle definition after three workouts. The same logic applies here.
The first two weeks feel strange. The tingling sensation is unfamiliar, and it is tempting to use the lowest setting and rush through zones. That approach produces nothing. Once I committed to the full 5-second hold per position and a proper loading schedule, the difference in jawline definition became visible around week six.
The detail most people miss is gel management. I used to apply just enough to cover the skin, and I spent half my sessions dealing with stinging. A generous, almost excessive layer of gel changes the entire experience. The device glides, the current feels smooth, and the session becomes something I actually look forward to.
Microcurrent works best as part of a broader routine, not a replacement for it. Pairing sessions with a good vitamin C serum in the morning and a retinol product at night amplifies the skin texture improvements noticeably. The device handles muscle tone. Your other products handle cell turnover and collagen support. Together, the results are faster and more visible than either approach alone.
My honest advice: be patient with the loading phase, be generous with the gel, and be consistent with your schedule. The technique is learnable in a week. The results take months. Both facts are worth knowing before you start.
— Gilda
Glowera’s microcurrent devices for your at-home routine
Glowera carries a curated selection of FDA-cleared microcurrent devices designed specifically for at-home facial toning. Each device in the range features adjustable current intensity, so you can start low during the loading phase and increase gradually as your skin adapts.

Glowera’s lineup includes devices paired with water-based conductive gels and accessories, giving you everything needed for a complete session from day one. Every product is sourced from trusted brands and verified for authenticity. The team also provides individual guidance to help you match the right device to your skin goals. Visit Glowera’s beauty tech store to browse the full range and find the device that fits your routine.
FAQ
How long should each microcurrent session last?
Most devices recommend sessions of 5–20 minutes depending on the areas treated and your experience level. Shorter sessions reduce total stimulation and limit visible results.
Can I use a microcurrent device every day?
Daily use every day of the week is not more effective than 5 sessions per week and may cause muscle fatigue. The loading phase calls for 5 sessions weekly, not 7.
What happens if I skip the conductive gel?
Skipping gel causes the electrical current to jump across dry skin, producing a stinging or zapping sensation. Water-based gels with hyaluronic acid are the correct choice; oil-based products block current flow entirely.
Which facial areas should I avoid with a microcurrent device?
Avoid the center of the throat and the thyroid area. Work along the sides of the neck only, and use the lowest intensity setting around the delicate eye area.
How soon will I see results from microcurrent treatments?
Most people notice visible changes in jawline definition and skin firmness around weeks 6–8 of the loading phase. Results depend on consistent technique, proper gel use, and adherence to the recommended session frequency.